Post-installion setup
- do this to make windows ltsc 2021 daily drivable.
- Make sure to check this out: Guide to install and optimize Windows 10 LTSC
- You might also wan't to take a look at this great project: LiveScript-LTSC-21H2 by Marctraider
Disable Telemtry
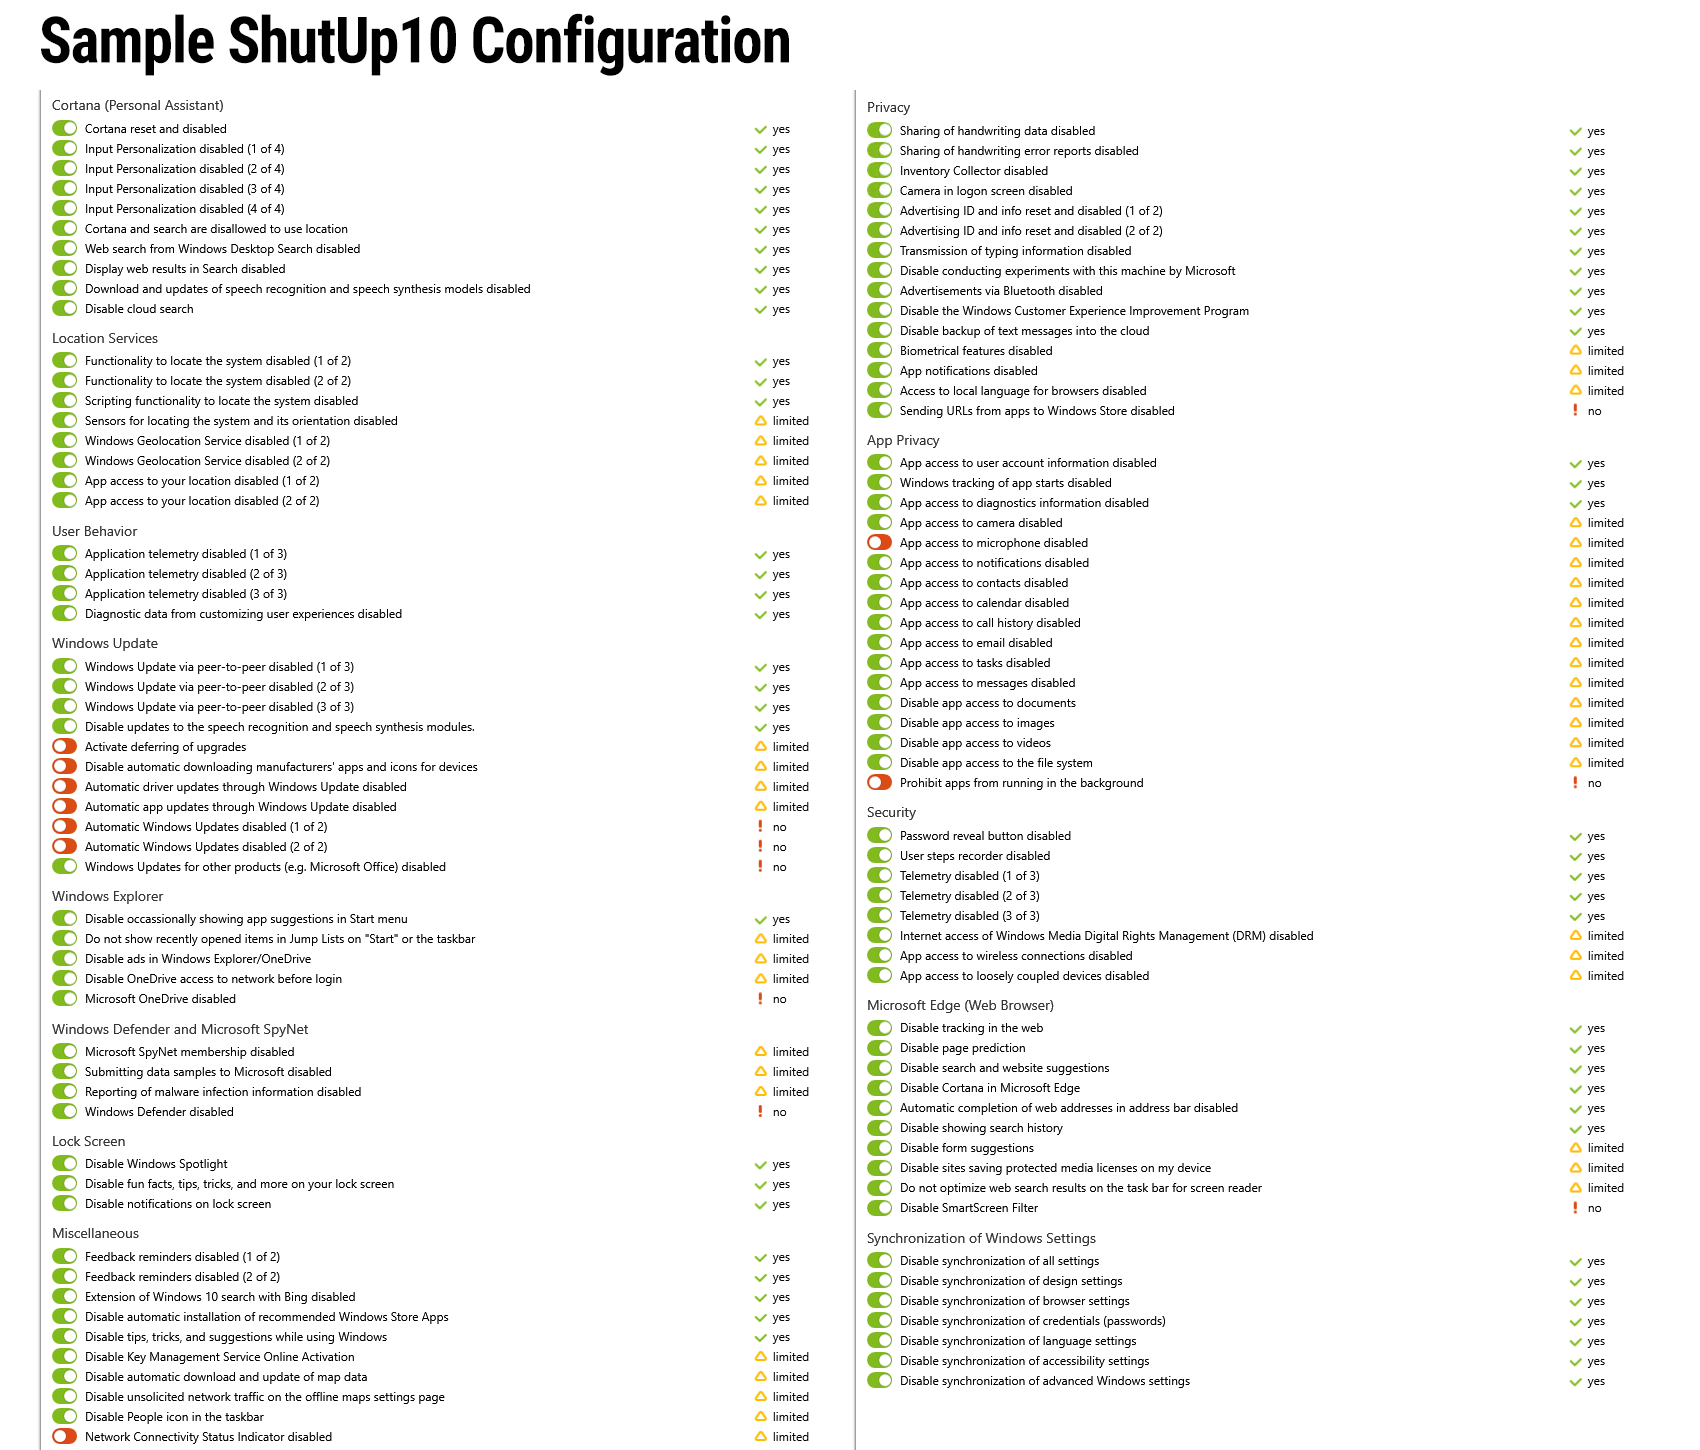
Using O&O ShutUp10
-
Luckily, no bloatware comes pre-installed with this version of windows, but, there's still some telemetry left.
-
Download and run O&O ShutUp10 to disable telemetry.
Disabling Allow Telemetry
-
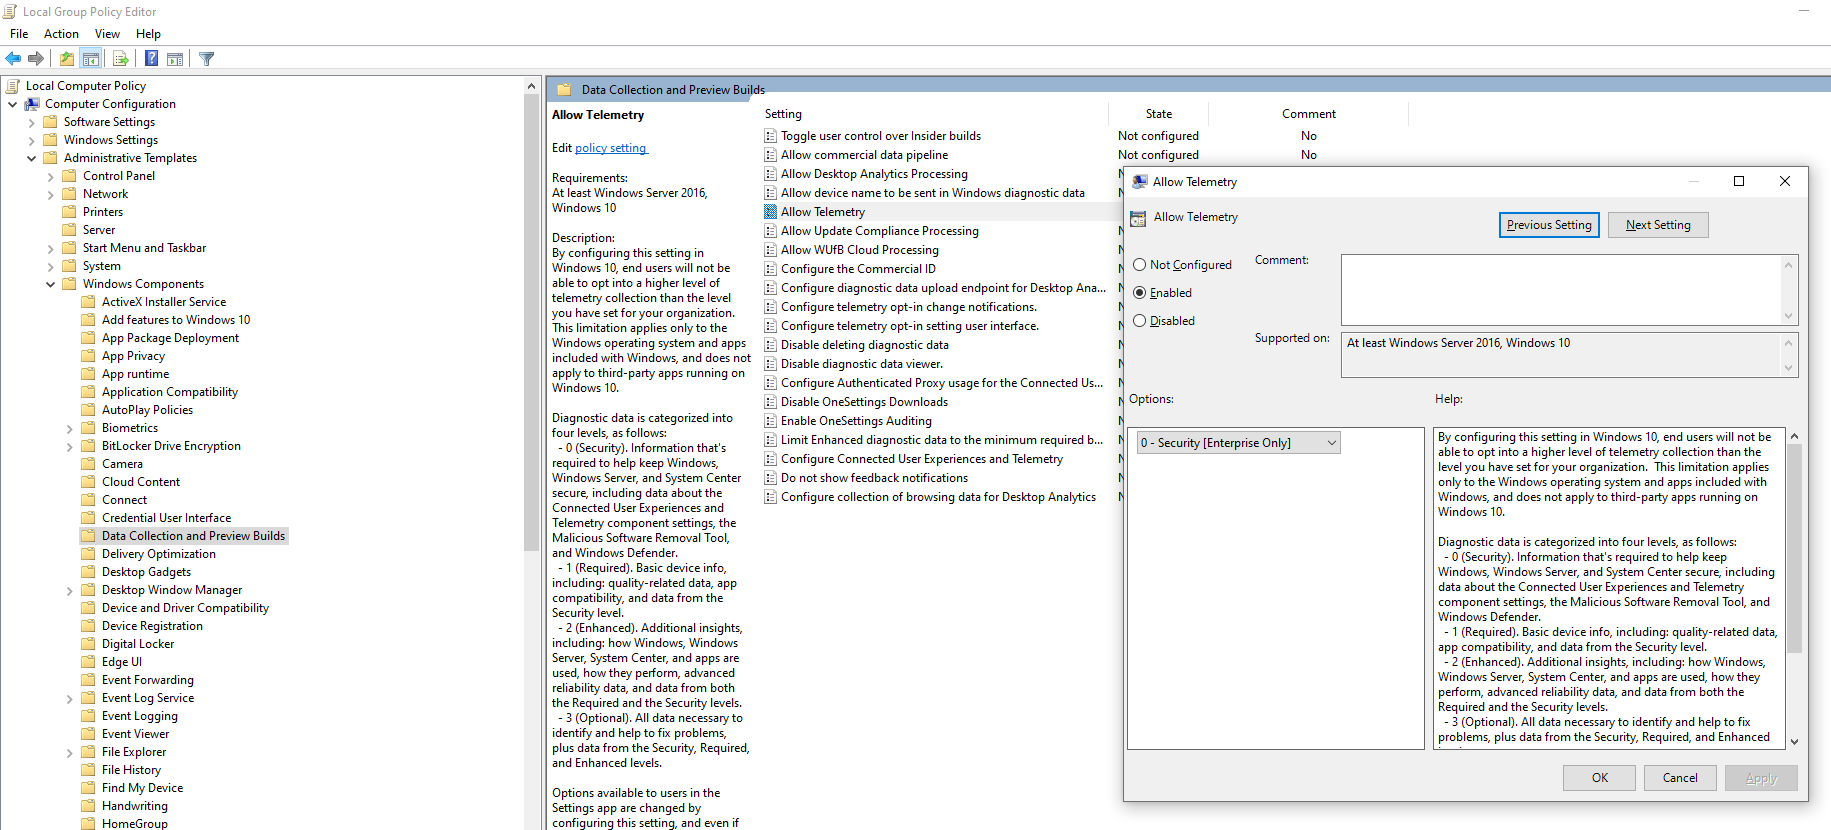
to disable Allow Telemetry
- Open the Local Group Policy Editor (
gpedit.mscin Run) - Go to "Administrative Templates" -> "Windows Components" -> "Data Collection and Peview Builds" -> "Allow Telemetry"
- Disable it
- Open the Local Group Policy Editor (
Access Public Network Shares
Folders/Data (0x80004005)
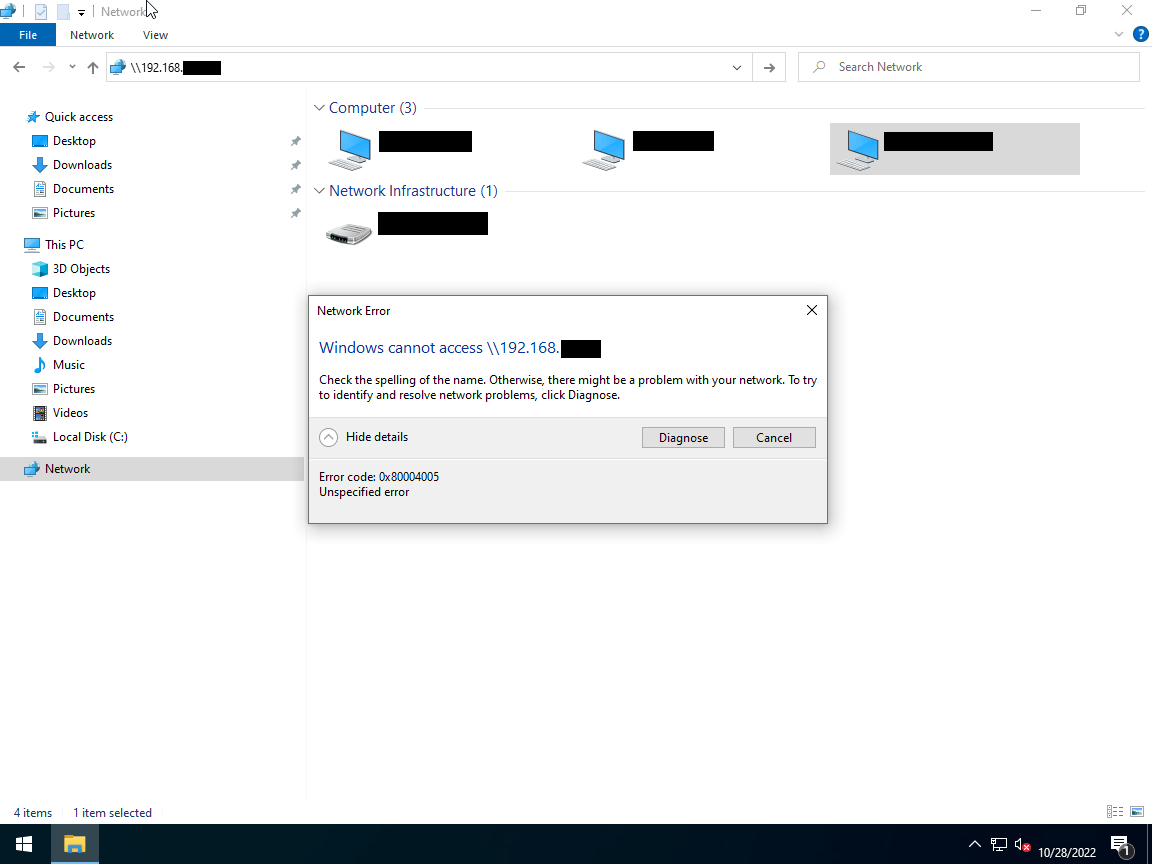
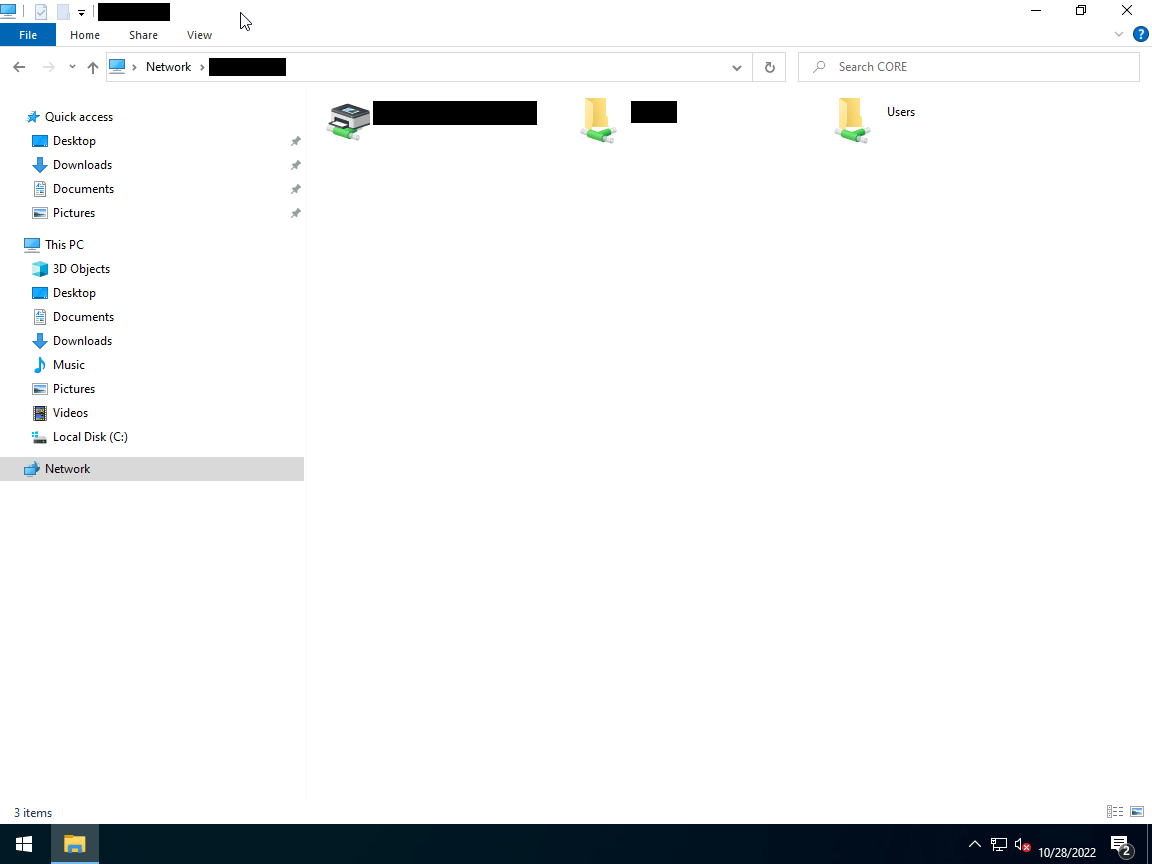
- If you are the kind of person that has your small local samba share setup at your house with no authentication (guest login allowed), you will run into this error:
0x80004005
-
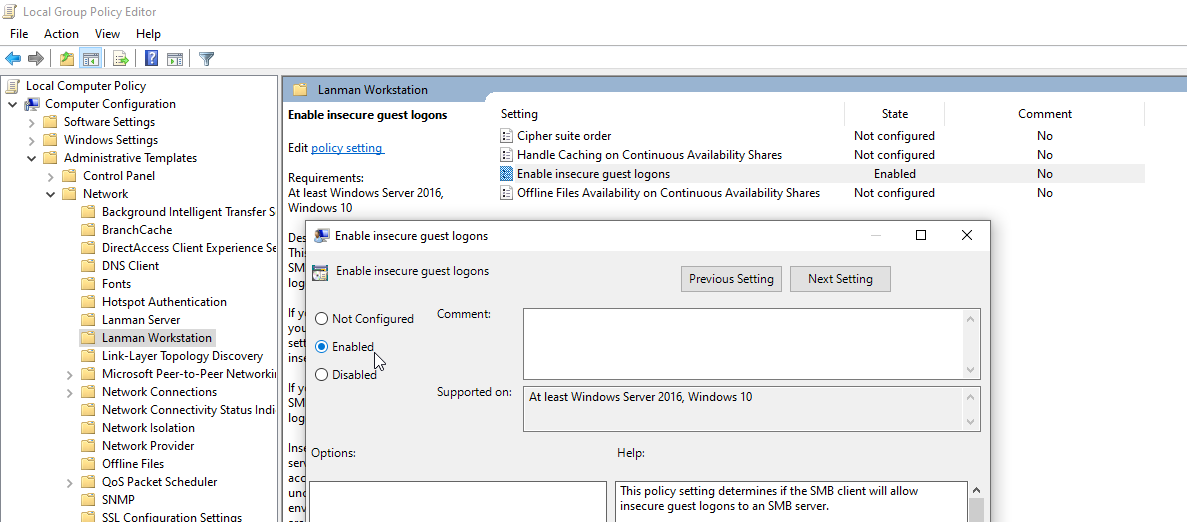
Microsoft posts the official "workaround" which is enabling the "AllowInsecureGuestAuth" group policy
- Open the Local Group Policy Editor (
gpedit.mscin Run) - Go to "Administrative Templates" -> "Networks" -> "Lanman Workstation" -> "Enable insecure guest logons"
- Enable it
- Open the Local Group Policy Editor (
- And it works
Printers (0x0000011b)
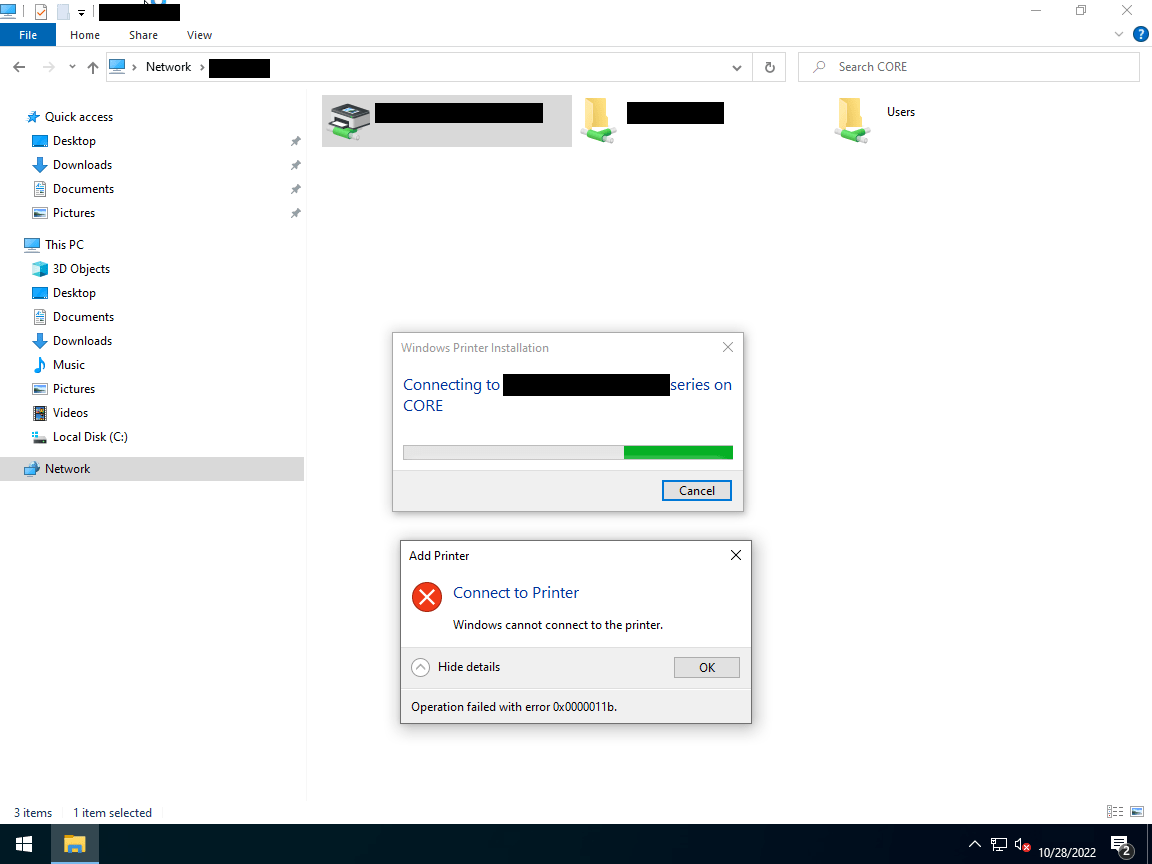
- But, when you try to access a printer, you will get this error:
0x0000011b
-
The posted official workaround is incomplete and printing doesn't fully respect this group policy configuration because as a fix for CVE-2021-1678 Microsoft increased the printer spooler protection but they forgot to let printing work for people who don't bother too much with proper encryption and authentication which
AllowInsecureGuestAuthdisables -
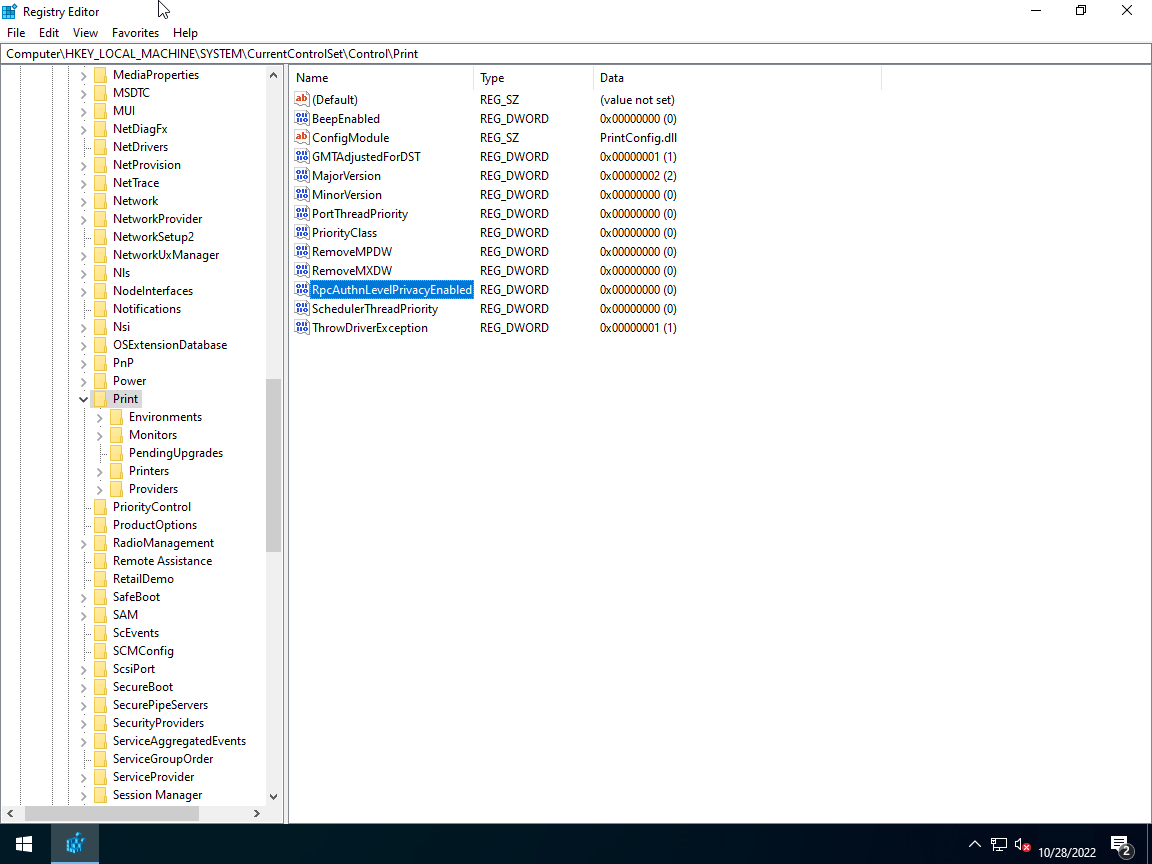
To fix it, add or modify a Printer Spooler registry setting called
RpcAuthnLevelPrivacyEnabled
[HKEY_LOCAL_MACHINE\System\CurrentControlSet\Control\Print]
"RpcAuthnLevelPrivacyEnabled"=dword:00000000
- or, run this powershell command:
Set-ItemProperty -Path 'HKLM:\System\CurrentControlSet\Control\Print' -Name 'RpcAuthnLevelPrivacyEnabled' -Value 0
- Restarting the Printer Spooler service is enough to apply the fix
- Looking back at both of these error, if they still won't work, try this instead:
-
Set
HKEY_LOCAL_MACHINE\SYSTEM\CurrentControlSet\Services\LanmanWorkstation\Parameters\AllowInsecureGuestAuthto 1- You can also run the command below:
Set-ItemProperty -Path 'HKLM:\SYSTEM\CurrentControlSet\Services\LanmanWorkstation\Parameters' -Name 'AllowInsecureGuestAuth' -Value 1 -
You may also have to enable/run 2 system services at
services.msc:- Function Discovery Provider Host
- Function Discovery Resource Publication
- both of which got disabled by default, and is for network sharing/browsing.
Restore Photo Viewer
Restore
The below guide is to enable Windows Photo Viewer for the current User. To enable it for the whole system, follow this guide by tenforums.com
- Save the contents below to file
.regfile
Windows Registry Editor Version 5.00

; Restore_Windows_Photo_Viewer_CURRENT_USER.reg
; Created by: Shawn Brink
; Created on: June 27th 2016
; Updated on: May 7th 2019
; Tutorial: https://www.tenforums.com/tutorials/14312-restore-windows-photo-viewer-windows-10-a.html


[HKEY_CURRENT_USER\SOFTWARE\Classes\.bmp]
@="PhotoViewer.FileAssoc.Tiff"

[HKEY_CURRENT_USER\SOFTWARE\Classes\.cr2]
@="PhotoViewer.FileAssoc.Tiff"

[HKEY_CURRENT_USER\SOFTWARE\Classes\.dib]
@="PhotoViewer.FileAssoc.Tiff"

[HKEY_CURRENT_USER\SOFTWARE\Classes\.gif]
@="PhotoViewer.FileAssoc.Tiff"

[HKEY_CURRENT_USER\SOFTWARE\Classes\.ico]
@="PhotoViewer.FileAssoc.Tiff"

[HKEY_CURRENT_USER\SOFTWARE\Classes\.jfif]
@="PhotoViewer.FileAssoc.Tiff"

[HKEY_CURRENT_USER\SOFTWARE\Classes\.jpe]
@="PhotoViewer.FileAssoc.Tiff"

[HKEY_CURRENT_USER\SOFTWARE\Classes\.jpeg]
@="PhotoViewer.FileAssoc.Tiff"

[HKEY_CURRENT_USER\SOFTWARE\Classes\.jpg]
@="PhotoViewer.FileAssoc.Tiff"

[HKEY_CURRENT_USER\SOFTWARE\Classes\.jxr]
@="PhotoViewer.FileAssoc.Tiff"

[HKEY_CURRENT_USER\SOFTWARE\Classes\.png]
@="PhotoViewer.FileAssoc.Tiff"

[HKEY_CURRENT_USER\SOFTWARE\Classes\.tif]
@="PhotoViewer.FileAssoc.Tiff"

[HKEY_CURRENT_USER\SOFTWARE\Classes\.tiff]
@="PhotoViewer.FileAssoc.Tiff"

[HKEY_CURRENT_USER\SOFTWARE\Classes\.wdp]
@="PhotoViewer.FileAssoc.Tiff"


[HKEY_CURRENT_USER\SOFTWARE\Microsoft\Windows\CurrentVersion\Explorer\FileExts\.bmp\OpenWithProgids]
"PhotoViewer.FileAssoc.Tiff"=hex(0):

[HKEY_CURRENT_USER\SOFTWARE\Microsoft\Windows\CurrentVersion\Explorer\FileExts\.cr2\OpenWithProgids]
"PhotoViewer.FileAssoc.Tiff"=hex(0):

[HKEY_CURRENT_USER\SOFTWARE\Microsoft\Windows\CurrentVersion\Explorer\FileExts\.dib\OpenWithProgids]
"PhotoViewer.FileAssoc.Tiff"=hex(0):

[HKEY_CURRENT_USER\SOFTWARE\Microsoft\Windows\CurrentVersion\Explorer\FileExts\.gif\OpenWithProgids]
"PhotoViewer.FileAssoc.Tiff"=hex(0):

[HKEY_CURRENT_USER\SOFTWARE\Microsoft\Windows\CurrentVersion\Explorer\FileExts\.ico\OpenWithProgids]
"PhotoViewer.FileAssoc.Tiff"=hex(0):

[HKEY_CURRENT_USER\SOFTWARE\Microsoft\Windows\CurrentVersion\Explorer\FileExts\.jpeg\OpenWithProgids]
"PhotoViewer.FileAssoc.Tiff"=hex(0):

[HKEY_CURRENT_USER\SOFTWARE\Microsoft\Windows\CurrentVersion\Explorer\FileExts\.bmp\OpenWithProgids]
"PhotoViewer.FileAssoc.Tiff"=hex(0):

[HKEY_CURRENT_USER\SOFTWARE\Microsoft\Windows\CurrentVersion\Explorer\FileExts\.jfif\OpenWithProgids]
"PhotoViewer.FileAssoc.Tiff"=hex(0):

[HKEY_CURRENT_USER\SOFTWARE\Microsoft\Windows\CurrentVersion\Explorer\FileExts\.jpe\OpenWithProgids]
"PhotoViewer.FileAssoc.Tiff"=hex(0):

[HKEY_CURRENT_USER\SOFTWARE\Microsoft\Windows\CurrentVersion\Explorer\FileExts\.jxr\OpenWithProgids]
"PhotoViewer.FileAssoc.Tiff"=hex(0):

[HKEY_CURRENT_USER\SOFTWARE\Microsoft\Windows\CurrentVersion\Explorer\FileExts\.jpeg\OpenWithProgids]
"PhotoViewer.FileAssoc.Tiff"=hex(0):

[HKEY_CURRENT_USER\SOFTWARE\Microsoft\Windows\CurrentVersion\Explorer\FileExts\.jpg\OpenWithProgids]
"PhotoViewer.FileAssoc.Tiff"=hex(0):

[HKEY_CURRENT_USER\SOFTWARE\Microsoft\Windows\CurrentVersion\Explorer\FileExts\.png\OpenWithProgids]
"PhotoViewer.FileAssoc.Tiff"=hex(0):

[HKEY_CURRENT_USER\SOFTWARE\Microsoft\Windows\CurrentVersion\Explorer\FileExts\.tif\OpenWithProgids]
"PhotoViewer.FileAssoc.Tiff"=hex(0):

[HKEY_CURRENT_USER\SOFTWARE\Microsoft\Windows\CurrentVersion\Explorer\FileExts\.tiff\OpenWithProgids]
"PhotoViewer.FileAssoc.Tiff"=hex(0):

[HKEY_CURRENT_USER\SOFTWARE\Microsoft\Windows\CurrentVersion\Explorer\FileExts\.wdp\OpenWithProgids]
"PhotoViewer.FileAssoc.Tiff"=hex(0):
-
then, Right click -> Merge
-
Go to the Default Apps section in Settings and select Micrososft Photo Viewer
Alternative
The only good alternative to Microsoft Photos is Honeyview
To install HoneyView with chocolatey, run:
choco install honeyview.install
OneDrive Problem
Source: https://rentry.org/od_problem
Problem
- The personal Onedrive icon inside navigation panel does not work. The property page shows blank. By using
Win+Rto runshell:::{018D5C66-4533-4307-9B53-224DE2ED1FE6}, you should see the OneDrive folder opened but it’s not. - However, the business account will work completely fine and also other file sync application such as iCloud and nextCloud.
- This happens to all latest OneDrive version (32/64 bit) installed per users or for all users under Windows 10 LTSC 2021.
- by the way, the default version bundled with Windows 10 is 32 bit regardless of the Windows version.
Reason
- When you setup the personal OneDrive account, the client should register the icon in navigation panel pointing to a CLSID (Basically the GUID of the folder registered as Known Folders)
{A52BBA46-E9E1-435f-B3D9-28DAA648C0F6}. - This is the CLSID of the OneDrive folder which should be registered meanwhile, and it contains the path to the OneDrive folder.
- BUT the client did not do so in LTSC
- Therefore, when you start the explorer, the icon itself was displayed, but it points to a ID which doesn’t exist.
Solution
- Copy the following content into a text file, save it as
ANYNAME.reg, double click on it and let the regedit import it. Restart the file explorer and all set! - This only applies if your OneDrive folder is at the default location. e.g.
C:\User\username\OneDrive. - If it’s not but still under your user folder e.g.
C:\User\username\ExampleFolder, you need to change the value ofRelativePathtoExampleFolder. - If it’s not under your user folder, e.g.
E:\OneDrive, you need to remove the line"ParentFolder"="{5E6C858F-0E22-4760-9AFE-EA3317B67173}", and change the value of RelativePath to the absolute path such as"RelativePath"="E:\OneDrive".
Windows Registry Editor Version 5.00

[HKEY_LOCAL_MACHINE\SOFTWARE\Microsoft\Windows\CurrentVersion\Explorer\FolderDescriptions\{5E6C858F-0E22-4760-9AFE-EA3317B67173}]
"Category"=dword:00000002
"Name"="Profile"

[HKEY_LOCAL_MACHINE\SOFTWARE\Microsoft\Windows\CurrentVersion\Explorer\FolderDescriptions\{A52BBA46-E9E1-435f-B3D9-28DAA648C0F6}]
"Attributes"=dword:00000001
"Category"=dword:00000004
"DefinitionFlags"=dword:00000040
"Icon"=hex(2):25,00,53,00,79,00,73,00,74,00,65,00,6d,00,52,00,6f,00,6f,00,74,  00,25,00,5c,00,73,00,79,00,73,00,74,00,65,00,6d,00,33,00,32,00,5c,00,69,00,  6d,00,61,00,67,00,65,00,72,00,65,00,73,00,2e,00,64,00,6c,00,6c,00,2c,00,2d,  00,31,00,30,00,34,00,30,00,00,00
"LocalizedName"=hex(2):40,00,25,00,53,00,79,00,73,00,74,00,65,00,6d,00,52,00,  6f,00,6f,00,74,00,25,00,5c,00,53,00,79,00,73,00,74,00,65,00,6d,00,33,00,32,  00,5c,00,53,00,65,00,74,00,74,00,69,00,6e,00,67,00,53,00,79,00,6e,00,63,00,  43,00,6f,00,72,00,65,00,2e,00,64,00,6c,00,6c,00,2c,00,2d,00,31,00,30,00,32,  00,34,00,00,00
"LocalRedirectOnly"=dword:00000001
"Name"="OneDrive"
"ParentFolder"="{5E6C858F-0E22-4760-9AFE-EA3317B67173}"
"ParsingName"="shell:::{018D5C66-4533-4307-9B53-224DE2ED1FE6}"
"RelativePath"="OneDrive"
Install Chocolately
Click here for more information.
Install WhatsApp Desktop
Installing WhatsApp on Windows LTSC 2021 requires a few extra steps since the Microsoft Store isn’t natively available. Here’s a simple guide to get it set up:
Approach 1
This doesn't always work!
Visit RedrootDEV/WhatsAppDesktop-NoStore repository and download the latest release. Extract it and run the executable as an Administrator. It will download the msixbundle and install it for you. It will also update it, if already installed.
Approach 2
Step 1: Get the WhatsApp Desktop URL
- Go to the Microsoft Store’s WhatsApp Desktop page.
- Copy the URL of the page.
Step 2: Generate Download Links for Required Files
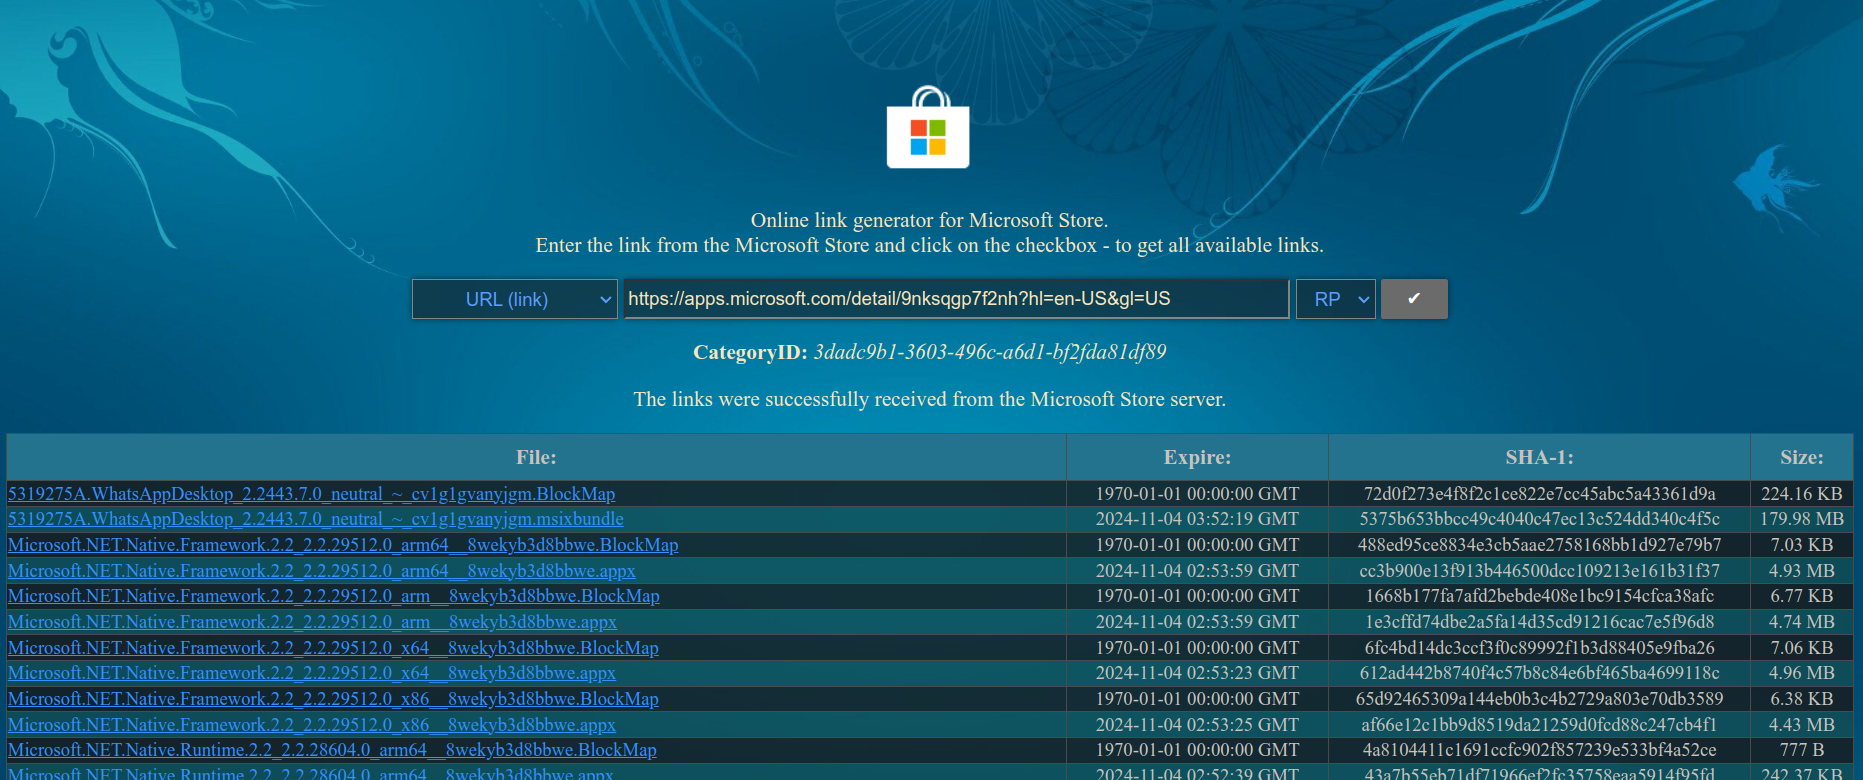
- Visit store.rg-adguard.net.
- Paste the copied WhatsApp Desktop URL in the input field.
- Set Request Type to “URL (link)” and Select ring to “PR.”
- Click to generate the download links for the .appx or .msixbundle files required for installation.
Step 3: Download the Necessary Files
(This) can also be used to download the dependencies.
To install WhatsApp Desktop, you’ll need to download several files by architecture. For most users, the following files are required:
- WhatsApp Desktop
5319275A.WhatsAppDesktop_2.2443.7.0_neutral_~_cv1g1gvanyjgm.msixbundle
- Dependencies
Microsoft.NET.Native.Framework.2.2_2.2.29512.0_x64__8wekyb3d8bbwe.appxMicrosoft.NET.Native.Runtime.2.2_2.2.28604.0_x64__8wekyb3d8bbwe.appxMicrosoft.UI.Xaml.2.8_8.2310.30001.0_x64__8wekyb3d8bbwe.appxMicrosoft.VCLibs.140.00.UWPDesktop_14.0.33728.0_x64__8wekyb3d8bbwe.appxMicrosoft.VCLibs.140.00_14.0.33519.0_x64__8wekyb3d8bbwe.appx
To download each file, right-click the hyperlink, select “Copy link address,” open a new tab, and paste the link to start the download.
Step 4: Download the App Installer
To install .msixbundle files, you’ll need Microsoft’s App Installer:
- Download it from the Microsoft Docs.
- The file should be named something like:
Microsoft.DesktopAppInstaller_8wekyb3d8bbwe.msixbundle
Step 5: Install the Dependencies
Now, we’ll install each of the dependencies using PowerShell:
- Open PowerShell as Administrator.
- Run the following command to install each dependency file, replacing
FilePath.Appxwith the actual path to each file.Add-AppxPackage -Path .\FilePath.Appx
Install these files in any order:
Microsoft.NET.Native.Framework.2.2_2.2.29512.0_x64__8wekyb3d8bbwe.appxMicrosoft.NET.Native.Runtime.2.2_2.2.28604.0_x64__8wekyb3d8bbwe.appxMicrosoft.UI.Xaml.2.8_8.2310.30001.0_x64__8wekyb3d8bbwe.appxMicrosoft.VCLibs.140.00.UWPDesktop_14.0.33728.0_x64__8wekyb3d8bbwe.appxMicrosoft.VCLibs.140.00_14.0.33519.0_x64__8wekyb3d8bbwe.appx
Similarly, install the App Installer:
Microsoft.DesktopAppInstaller_8wekyb3d8bbwe.msixbundle

Step 6: Install WhatsApp Desktop
- After installing the dependencies, double-click the downloaded WhatsApp Desktop file:
5319275A.WhatsAppDesktop_2.2443.7.0_neutral_~_cv1g1gvanyjgm.msixbundle
- This will open with the Desktop App Installer. Click Install to complete the setup.
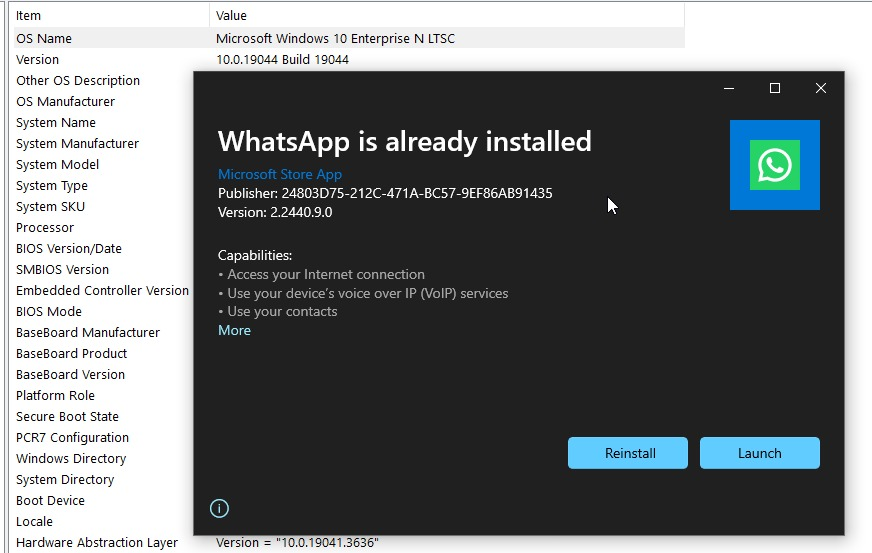
Yay!
With the App Installer now set up, you can install other .appx and .msixbundle packages directly.